> ## Documentation Index
> Fetch the complete documentation index at: https://generaltranslation.mintlify.site/llms.txt
> Use this file to discover all available pages before exploring further.
# 3-legged OAuth 플로를 사용하여 액세스 토큰 획득하기
export const Button = ({href, children}) => {
return ;
};
### 3-legged OAuth 플로우를 사용하여 액세스 토큰 얻기
다른 사용자를 대신하여 작업을 수행하려면 해당 사용자의 액세스 토큰을 먼저 발급받아야 합니다. 액세스 토큰은 요청이 어떤 X 계정을 대신해 수행되는지를 지정하므로, 이를 얻기 위해서는 먼저 해당 사용자가 여러분에게 액세스 권한을 부여해야 합니다. 이 토큰은 만료되지 않지만 사용자가 언제든지 철회(revoke)할 수 있습니다.
X는 3-legged OAuth 플로우를 통해 사용자 액세스 토큰을 발급받을 수 있도록 합니다. 이 플로우에서는 사용자를 X로 리디렉션하여 애플리케이션을 승인하도록 한 뒤, 애플리케이션이 **access token**과 access token secret을 발급받게 됩니다. 이 플로우는 [X로 로그인 구현하기](/ko/resources/fundamentals/authentication/guides/log-in-with-x)에 설명된 플로우와 거의 동일하지만, 다음 두 가지 예외가 있습니다:
* [GET oauth/authenticate](/ko/resources/fundamentals/authentication/api-reference#get-oauth-authenticate) 대신 [GET oauth/authorize](/ko/resources/fundamentals/authentication/api-reference#get-oauth-authorize) 엔드포인트를 사용합니다.
* 이전에 액세스가 허용되었더라도, 사용자는 애플리케이션에 대한 액세스 권한을 승인하라는 메시지를 **항상** 보게 됩니다.
시작하기 전에, [애플리케이션](/ko/resources/fundamentals/developer-apps)의 권한을 확인하고 consumer key들 및 callback URL을 파악하고 있어야 합니다. callback URL이나 공개적으로 접근 가능한 UI가 없는 경우, [PIN 기반 인가](/ko/resources/fundamentals/authentication/oauth-1-0a/pin-based-oauth)를 사용하는 것을 고려하십시오. 이는 인가 후 사용자를 리디렉션하기 위해 웹 브라우저에 접근하거나 웹 브라우저를 임베드할 수 없는 애플리케이션을 위한 방식입니다.
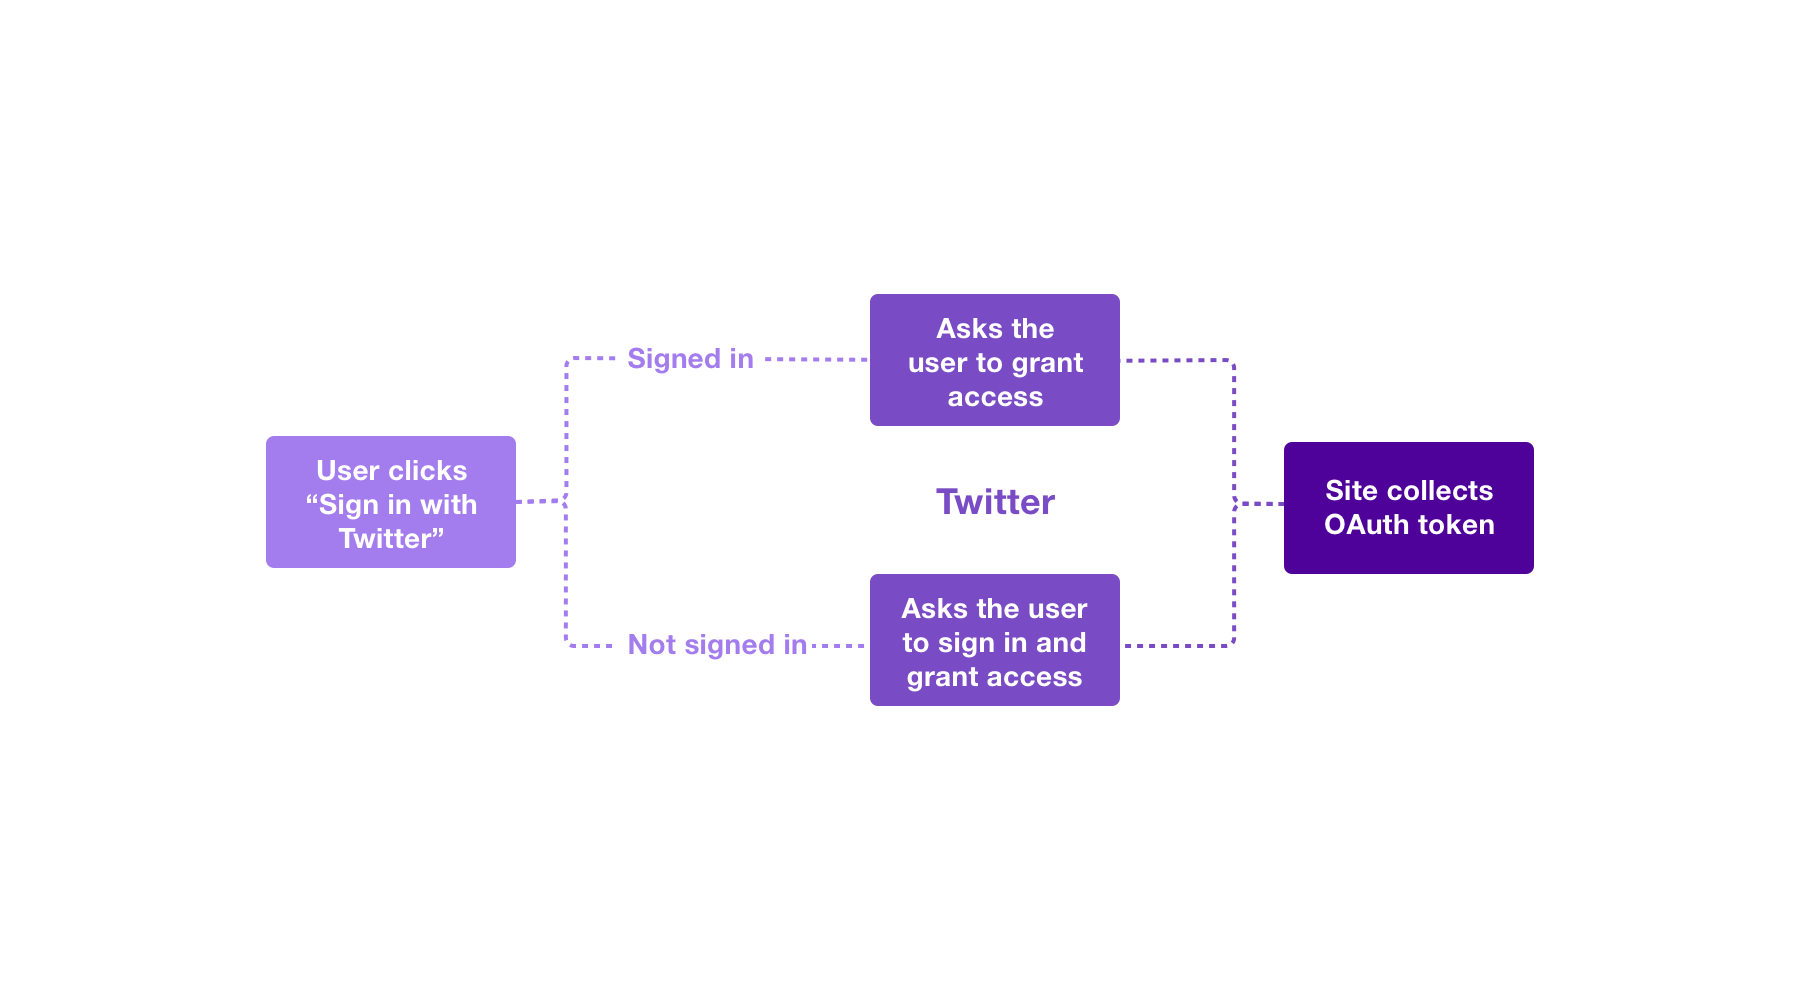
3-legged 로그인 상호작용에서 가능한 상태는 다음 순서도에 나와 있습니다:
#### 프로세스 개요
개괄적으로 3-Legged OAuth 프로세스는 다음과 같이 동작합니다.
1. consumer 애플리케이션이 request token을 얻을 수 있도록 요청을 생성합니다.
2. 사용자가 인증을 수행하면, consumer 애플리케이션에 request token이 전달됩니다.
3. request token을 실제로 사용할 수 있는 사용자 access token으로 변환합니다.
**용어 설명**
아래 가이드에서는 동일한 개념을 가리키는 서로 다른 용어가 등장할 수 있습니다.
**Client 자격 증명:**
* App Key === API Key === Consumer API Key === Consumer Key === Customer Key === `oauth_consumer_key`
* App Key Secret === API Secret Key === Consumer Secret === Consumer Key === Customer Key === `oauth_consumer_secret`
* Callback URL === `oauth_callback`
**임시 자격 증명:**
* Request Token === `oauth_token`
* Request Token Secret === `oauth_token_secret`
* oauth\_verifier
**토큰 자격 증명:**
* Access token === Token === 결과로 생성되는 `oauth_token`
* Access token secret === Token Secret === 결과로 생성되는 `oauth_token_secret`
#### 단계별 안내
**1단계: [POST oauth/request\_token](/ko/resources/fundamentals/authentication/api-reference#post-oauth-request-token)**
consumer 애플리케이션이 request token을 얻을 수 있도록 요청을 생성합니다.
이 요청에서 고유한 파라미터는 `oauth_callback` 하나뿐이며, 사용자가 2단계를 완료한 후 리디렉션되기를 원하는 URL을 [URL 인코딩](/ko/resources/fundamentals/authentication/oauth-1-0a/percent-encoding-parameters)한 값이어야 합니다. 나머지 파라미터는 OAuth 서명 과정에서 추가됩니다.
참고: [POST oauth/request\_token](/ko/resources/fundamentals/authentication/api-reference#post-oauth-request-token) 엔드포인트에서 사용하는 모든 callback URL은 개발자 콘솔의 앱 상세 정보 페이지에 있는 [개발자 App](/ko/resources/fundamentals/developer-apps) 설정에 미리 구성되어 있어야 합니다.
**요청에 포함:**
`oauth_callback="https%3A%2F%2FyourCallbackUrl.com"`
`oauth_consumer_key="cChZNFj6T5R0TigYB9yd1w" `
앱은 응답의 HTTP 상태 코드를 확인해야 합니다. 200이 아닌 값은 모두 실패를 의미합니다. 응답 본문에는 `oauth_token`, `oauth_token_secret`, `oauth_callback_confirmed` 파라미터가 포함됩니다. 앱은 `oauth_callback_confirmed`가 true인지 확인하고, 나머지 두 값은 다음 단계에서 사용할 수 있도록 저장해야 합니다.
**응답에 포함**
`oauth_token=NPcudxy0yU5T3tBzho7iCotZ3cnetKwcTIRlX0iwRl0`
`oauth_token_secret=veNRnAWe6inFuo8o2u8SLLZLjolYDmDP7SzL0YfYI`
`oauth_callback_confirmed=true`
**2단계: [GET oauth/authorize](/ko/resources/fundamentals/authentication/api-reference#get-oauth-authorize)**
사용자가 인증을 수행하도록 하고, consumer 애플리케이션에 request token을 보냅니다.
**사용자를 리디렉션할 예시 URL:**
`https://api.x.com/oauth/authorize?oauth_token=NPcudxy0yU5T3tBzho7iCotZ3cnetKwcTIRlX0iwRl0`
인증이 성공하면, `callback_url`은 `oauth_token`과 `oauth_verifier` 파라미터가 포함된 요청을 받게 됩니다. 애플리케이션은 이 토큰이 1단계에서 받은 request token과 일치하는지 확인해야 합니다.
**클라이언트의 리디렉션에서 온 요청:**
`https://yourCallbackUrl.com?oauth_token=NPcudxy0yU5T3tBzho7iCotZ3cnetKwcTIRlX0iwRl0&oauth_verifier=uw7NjWHT6OJ1MpJOXsHfNxoAhPKpgI8BlYDhxEjIBY`
**3단계: [POST oauth/access\_token](/ko/resources/fundamentals/authentication/api-reference#post-oauth-access-token)**
request token을 사용할 수 있는 access token으로 변환합니다.
request token을 사용할 수 있는 access token으로 변환하려면, 애플리케이션은 2단계에서 얻은 `oauth_verifier` 값을 포함하여 [POST oauth/access\_token](/ko/resources/fundamentals/authentication/api-reference#post-oauth-access-token) 엔드포인트로 요청을 보내야 합니다. request token은 헤더의 `oauth_token` 항목에도 전달되지만, 이는 서명 과정에서 자동으로 추가됩니다.
**요청에 포함:**
`POST /oauth/access_token`
`oauth_consumer_key=cChZNFj6T5R0TigYB9yd1w`
`oauth_token=NPcudxy0yU5T3tBzho7iCotZ3cnetKwcTIRlX0iwRl0`
`oauth_verifier=uw7NjWHT6OJ1MpJOXsHfNxoAhPKpgI8BlYDhxEjIBY`
성공적인 응답에는 `oauth_token`, `oauth_token_secret` 파라미터가 포함됩니다. 이 토큰과 토큰 시크릿은 저장해 두었다가 이후 X API에 대한 인증된 요청에 사용해야 합니다. 사용자의 신원을 확인하려면 [GET account/verify\_credentials](/ko/resources/fundamentals/authentication/api-reference)를 사용합니다.
**응답에 포함:**
`oauth_token=7588892-kagSNqWge8gB1WwE3plnFsJHAZVfxWD7Vb57p0b4`
`oauth_token_secret=PbKfYqSryyeKDWz4ebtY3o5ogNLG11WJuZBc9fQrQo`
**이 자격 증명을 OAuth 1.0a(애플리케이션-사용자) 기반 요청에 사용하기**
이제 사용자 액세스 토큰을 얻었으므로, 이를 사용해 [POST statuses/update](/ko/x-api/posts/manage-tweets/introduction)와 같은 일부 API에 접근하여 사용자를 대신해 Tweet을 생성할 수 있습니다.
**요청에는 다음이 포함됩니다:**
`POST statuses/update.json`
`oauth_consumer_key=cChZNFj6T5R0TigYB9yd1w`
`oauth_token=7588892-kagSNqWge8gB1WwE3plnFsJHAZVfxWD7Vb57p0b4`
#### 샘플 사용 사례
표준 플로는 웹 기반이며 3-legged OAuth 인가 플로를 사용합니다. 여기 나와 있는 스크린샷은 [https://github.com/xdevplatform/twauth-web](https://github.com/xdevplatform/twauth-web)에서 소스를 확인할 수 있는 샘플의 일부입니다.
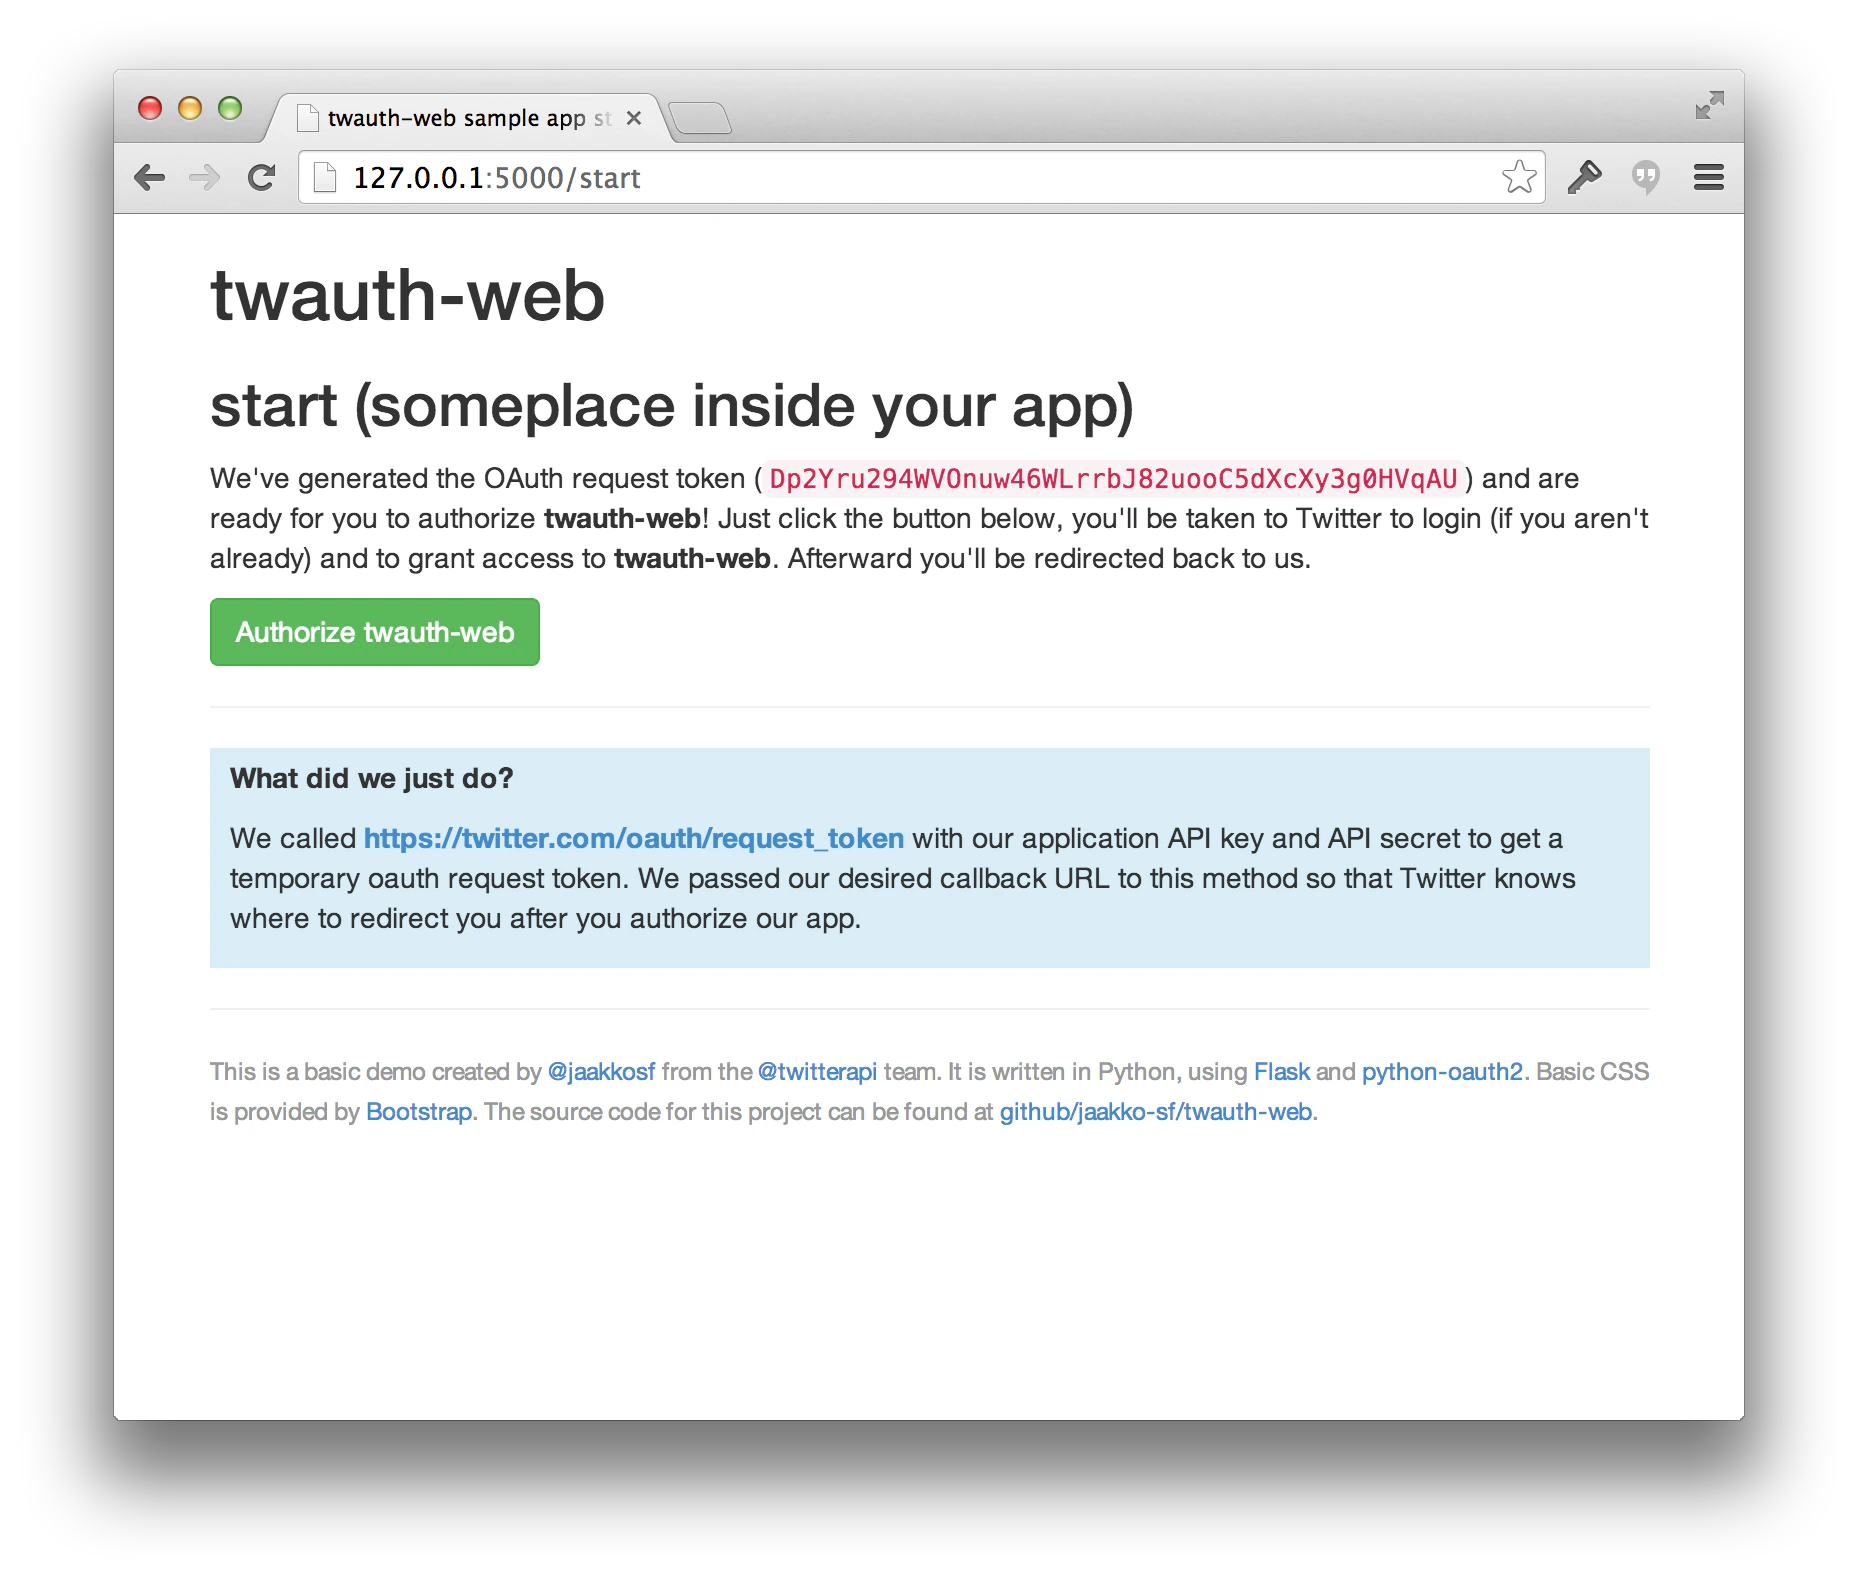
애플리케이션의 어느 시점에서든, 사용자가 애플리케이션을 인가할 수 있도록 X로 리디렉트해야 합니다.
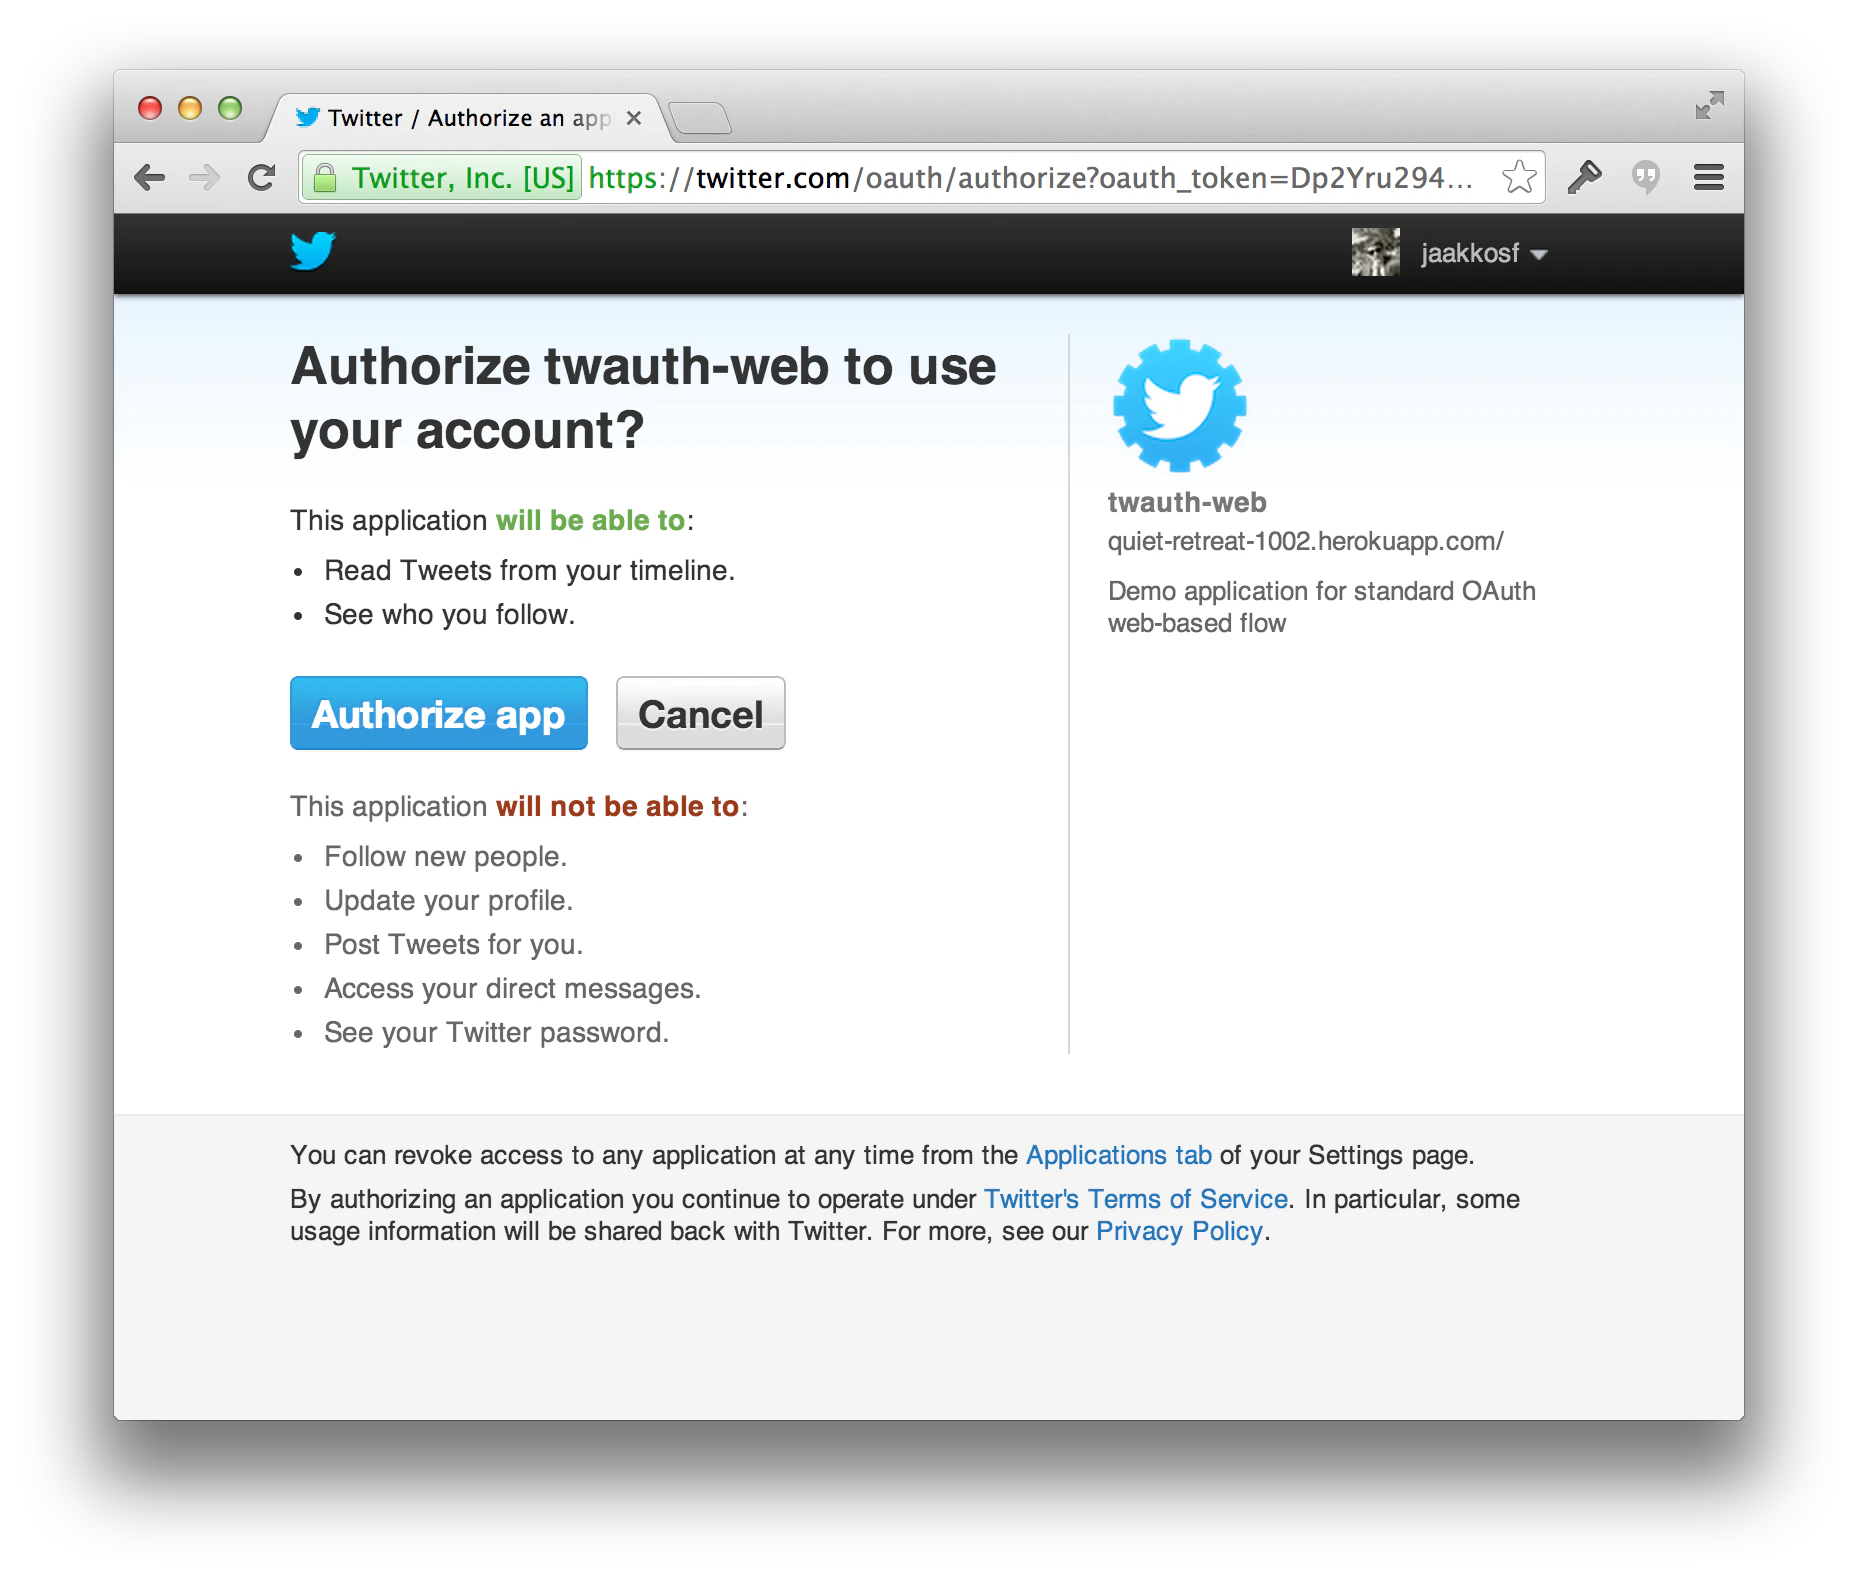
 request token과 함께 X로 리디렉트하면, 사용자에게 애플리케이션을 인가하라는 프롬프트가 표시됩니다.
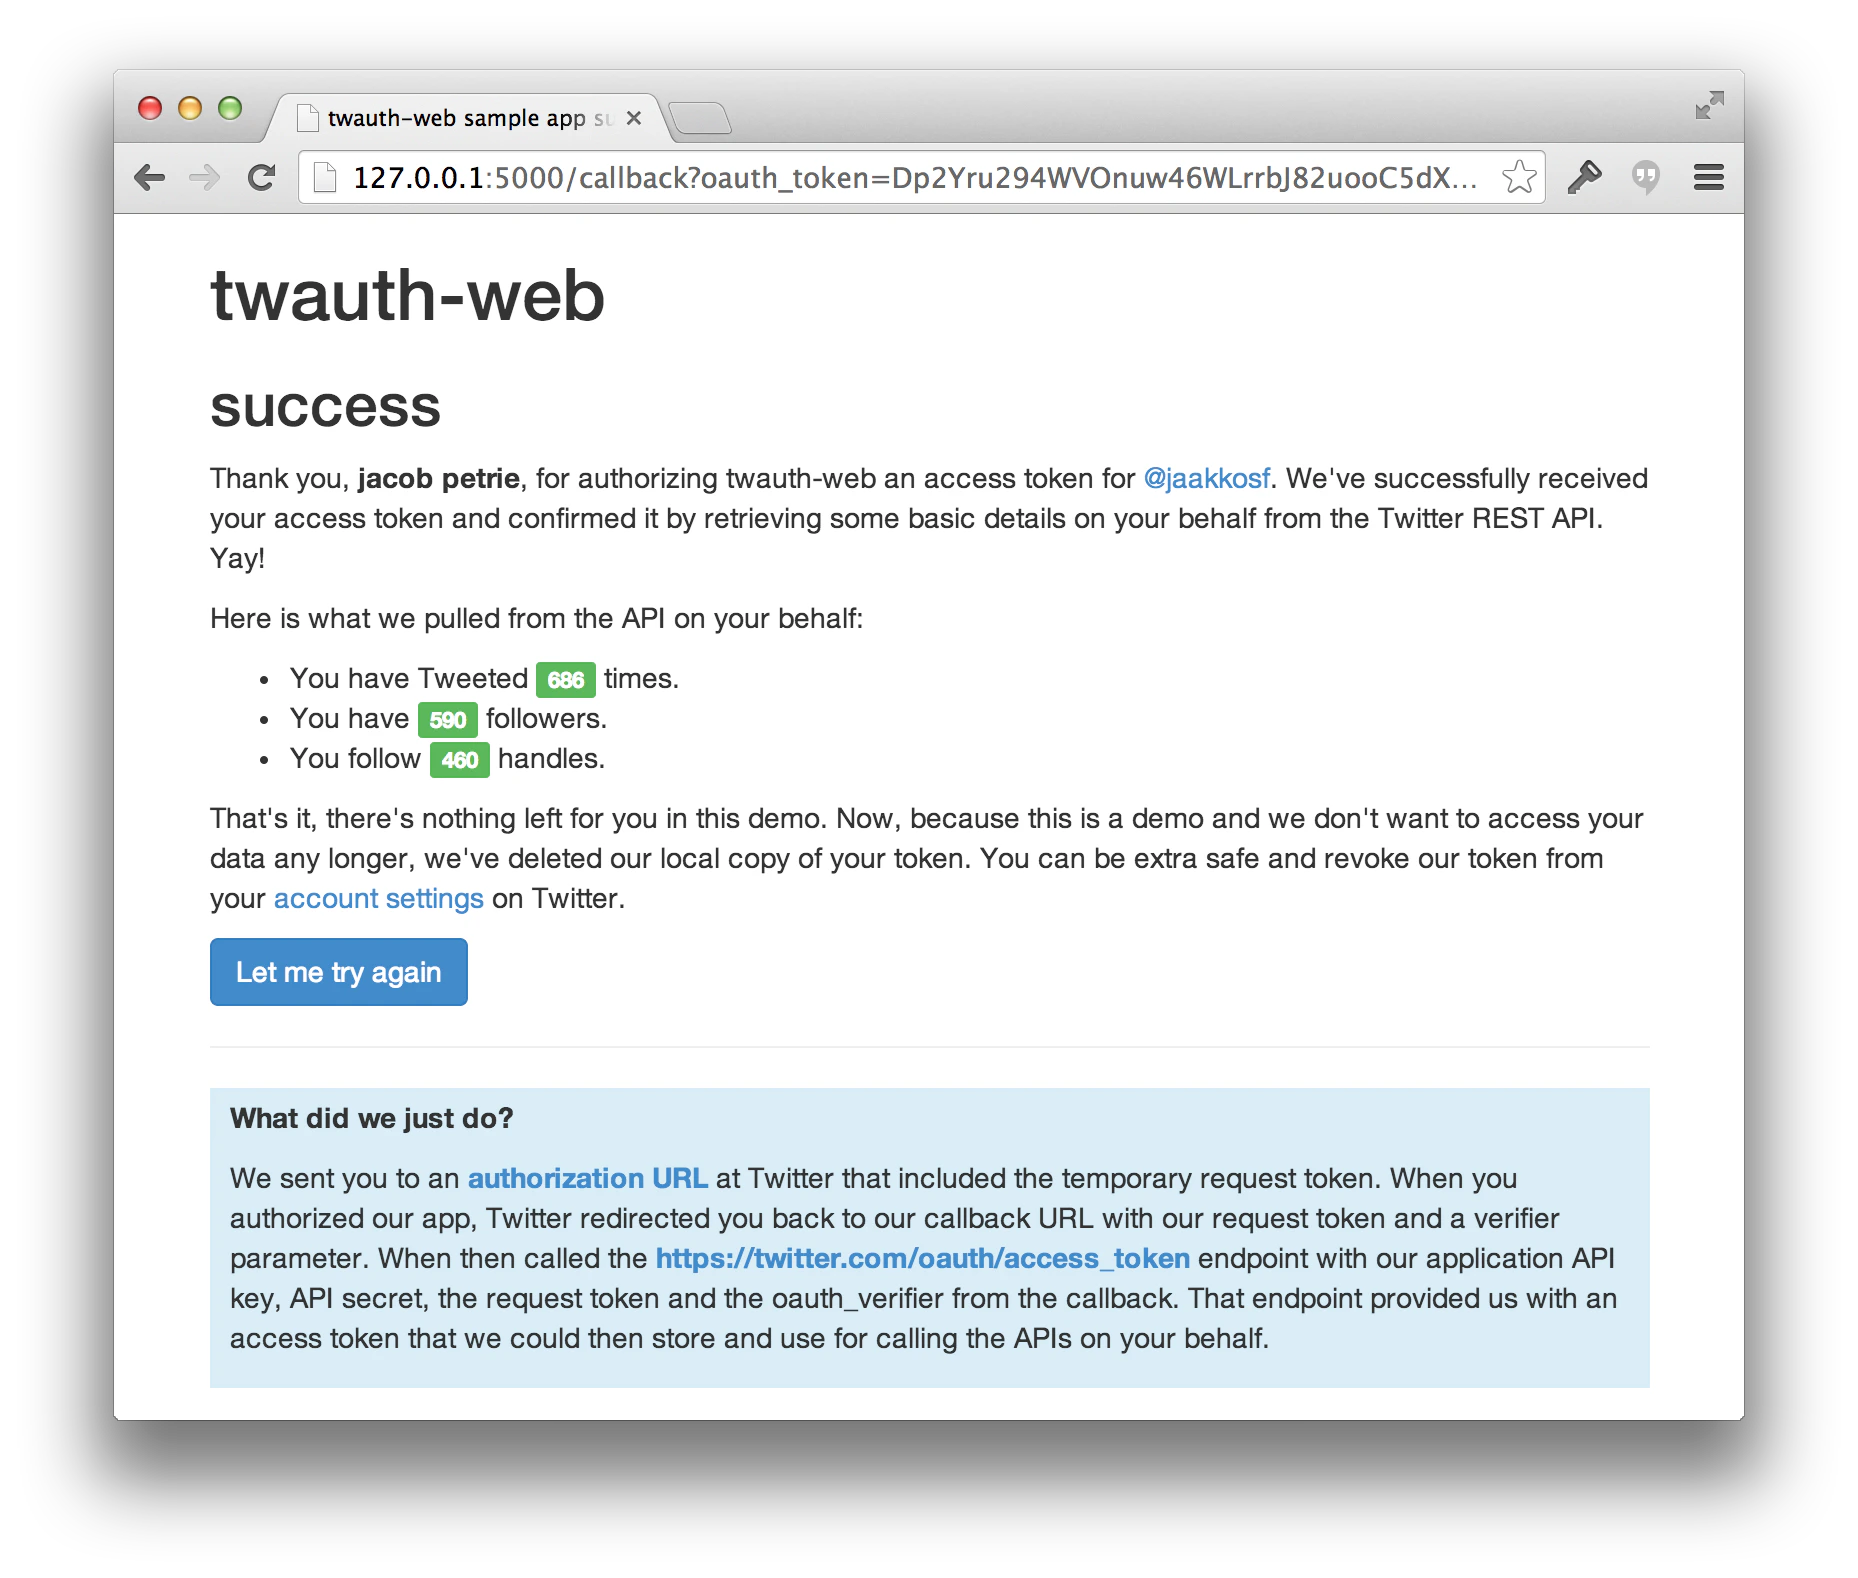
 사용자가 애플리케이션을 인가하면, request token을 생성할 때 제공했던 callback URL로 리디렉트됩니다. 이 정보를 사용해 해당 사용자의 영구적인 access token을 얻고, 이를 로컬에 저장합니다.